0

Every cosplayer has made their own custom tape patterns. You know the drill: wrap yourself in cling wrap, layer masking tape on top, sketch your design, and violà! Instant costume pattern. But have you ever wished you didn’t have to wrap yourself up every time you need a pattern? What if you had a stunt double with your exact dimensions? Sounds like you need a cosplay mannequin.

How do I make a cosplay mannequin?

In this tutorial, I’ll go step by step through the process I used to create my inexpensive expanding foam cosplay mannequin. With a few hours of time, some basic materials, and a helping hand, you can cut down time spent making your patterns, and spend more time actually bringing your creations to life. Not to mention this mimics your body shape much closer than a traditional dress form, and for a quarter of the price. Let’s get started!

Some of the materials needed to create your own cosplay mannequin.

Tools & Materials Needed:


Step 1: Recruit a Friend to Help

The basic principle of this “cosplay mannequin” is to make a duct tape shell of your body, and fill it with rigid foam. So, naturally you will need help to encase your torso. Start by recruiting a friend who you are comfortable allowing to get up close and personal. Promise them it will be the last time you need to bother them about wrapping you up in plastic wrap… Unless you’re in to that sort of thing *wink wink wink*

Assistant helping rip and apply plastic wrap while making my cosplay mannequin.


Step 2: Get Comfy, and Grab Your Plastic Wrap

In order to ensure your cosplay mannequin is as close to your actual body measurements as possible, put on your form-fitting outfit before you get wrapped up. I chose a stretchy tank top and yoga shorts. Also be sure to wear any undergarments you plan to have on beneath your costumes that might alter your dimensions a bit (talkin’ about your bra, ladies!).
Sam in form fitting outfit for being wrapped in duct tape.
Once you’re nice and comfy, have your helping hand begin to wrap your torso in plastic wrap, starting from the middle of your thighs, and working up to just beneath your arm pits. Be sure to keep your arms free as long as possible so you can help your assistant rip tape strips. They’ll be thankful, trust me!
Sam, body wrapped up to armpits in plastic wrap.


Step 3: Start Wrapping Your Body with Duct Tape

While your arms are still free, help your assistant by ripping strips of duct tape for them to apply over the plastic wrap. Again, start from the bottom and work your way up to your arm pits. Not only does it give you the opportunity to help your assistant, but it keeps you more comfortable longer, too. Once you’re duct taped up to your armpits front and back, it’s time to move on to step four.
Sam from the side, wrapped in duct tape up to armpits.
Sam with duct tape wrapped up to arm puts, holding duct tape to help rip strips.


Step 4: Wrap Your Armpits, Chest, & Neck

In order to begin wrapping your arms, you’ll need to start by covering each armpit with it’s own piece of plastic wrap. Rip a long strip of wrap, and place it lengthwise over the top of your shoulder. Fold and tuck the ends together under your armpit. Then, use another long strip of wrap and again lay it over your shoulder, this time allowing it to drape down over your chest and shoulder blade. This piece should overlap the armpit plastic, leaving no skin exposed. I suggest doing this one arm at a time.
Wrapping plastic wrap over shoulder and under armpit, secured in place with tape (left), and duct tape strips lined up for use (right).
It helps during this step to keep a few pre-ripped pieces of duct tape handy (see photo above). Use these to help secure the plastic wrap as your assistant tucks the edges of plastic wrap under your arms.
Once your arm pit and chest are wrapped, you can begin to apply your duct tape over your shoulder. Work your way down your chest, under your armpit, and down your arm. Then, kiss your mobility goodbye, and repeat this process on your opposite arm.
Sam with one arm wrapped in duct tape, taking a last sip of beer before wrapping the other arm.

Sam fully wrapped in duct tape, facing forward.

Once both of your shoulders and arms are covered in duct tape, finish by repeating the plastic wrap and tape process on your neck. Wrap up until you are satisfied with the surface of duct tape. Also be sure to have no open holes in the duct tape. Otherwise, your expanding foam may leak out during the final steps.
After ensuring I was covered, I had my assistant add a second duct tape layer up my front and back for extra reinforcement. This step is optional, but the sturdier your shell, the better shape your cosplay mannequin will have in the end. Do make sure you have some duct tape left over after this step. You will need a little more duct tape in Step 6.


Step 5: Mark Your Tape, and Cut Off Your Shell

Once you’re all wrapped, it’s time to make registration marks before removing tape. I can not stress enough how important registration marks are to this process! Please do not skip this simple, crucial step.

Grab your sharpie. Beginning at your neck, have your assistant draw a solid line down your arms on both sides. On only one side, continue the line beneath your arm, armpit, and down the full length of your body. See the diagram to the right for where to draw your marks. This is your “cut line,” but we’re not quite ready to cut yet.

Sam from the back, fully wrapped in duct tape. Diagram markings show where the cut lines should be on duct tape. Left neck down to arm, left armpit down to leg, right neck down to arm.
Next, we need to add our registration marks. Draw thick perpendicular lines across the cut line. Draw these in two or three inch intervals across all cut lines. These will act as our “registration marks.” Make sure each registration mark is nice and thick, about 1/8″ to 1/4″ at least. These marks will ensure you can properly realign your tape shell once it is off of your body.
Registration marks and cut line drawn on top of shoulder.
Close up of registration marks drawn on top of duct tape.
Cutting up the cut line of your duct tape shell
When you are satisfied with your registration marks, have your assistant slowly and carefully cut off the duct tape shell. It helps if they are able to work their free hand up under the tape and plastic wrap as they cut, slightly pulling it away from your body as they cut.
Cut up the arms to your neck on both sides, then down the one full side of your body, along all the cut lines you marked. Before you know it, you’ll be free once again. Hooray!
Sam removing the duct tape shell after being cut out of it.
Sam showing off her duct tape shell after being cut free from the duct tape.
Before you move on to the next step, thank your assistant and let them know they are free to go about their normal daily activities. May I suggest buying them a cup of coffee or a beer? I think they deserve it. In any case, you’ve got the rest from here!


Step 6: Tape Your “Shell” Back Together

Now we need to close up the duct tape shell so our expanding foam won’t leak out of the sides. First, clean up any excess plastic wrap on the inside of your shell. Then, rip yourself a few strips of masking tape, and stick them in an easy to reach location. Apply a few strips of tape to one side of the cut line, between your registration marks. Then, carefully bring both sides together, aligning the registration marks as you go.
Duct tape shell with masking tape pieces lining one side of the cut seam.
Sam sitting on the floor taping the duct tape shell back together, supporting it on the floor and one arm.
I found it was easiest to work through this step on the floor, as I could use my legs to prop up my duct tape shell as I went. Don’t worry about aligning the registration marks perfectly at first, either. It’s okay to just get them close. You can go back and realign the marks one at a time once the shell is more stable.
Once your shell is loosely put back together along all the cut lines, it’s time to firmly close off the cuts from the inside. Rip a long strip of duct tape, and place it along the cut lines on the inside of your shell. Be sure you run a strip of duct tape over every cut line, or you risk leaking expanding foam out of the sides.
Detail of duct tape shell closed back together with masking tape strips.
Close up of adding a duct tape strip inside of duct tape shell to seal cut lines.


 * * UPDATE MARCH 2020 ** Important to note before you move on to the expanding foam sections: I have since learned I overfilled my duct tape mannequin during this initial test. I recommend being delicate with your application of foam initially, and using newspaper or similar to stuff your gaps to avoid over-filling. This being said, all the steps for the method I originally used are still listed below. If you are careful with your filling the first time, you should be able to cut out Step 10 completely. Happy crafting! * * [/one-whole]


Step 7: Prep Your Work Area for Expanding Foam

I highly suggesting working on these final steps in a garage or outdoor workspace. Expanding foam does not put off terrible fumes, but it is extremely difficult to get off of skin, furniture, and clothing. So, it’s best to work in an area you feel comfortable “getting dirty.”
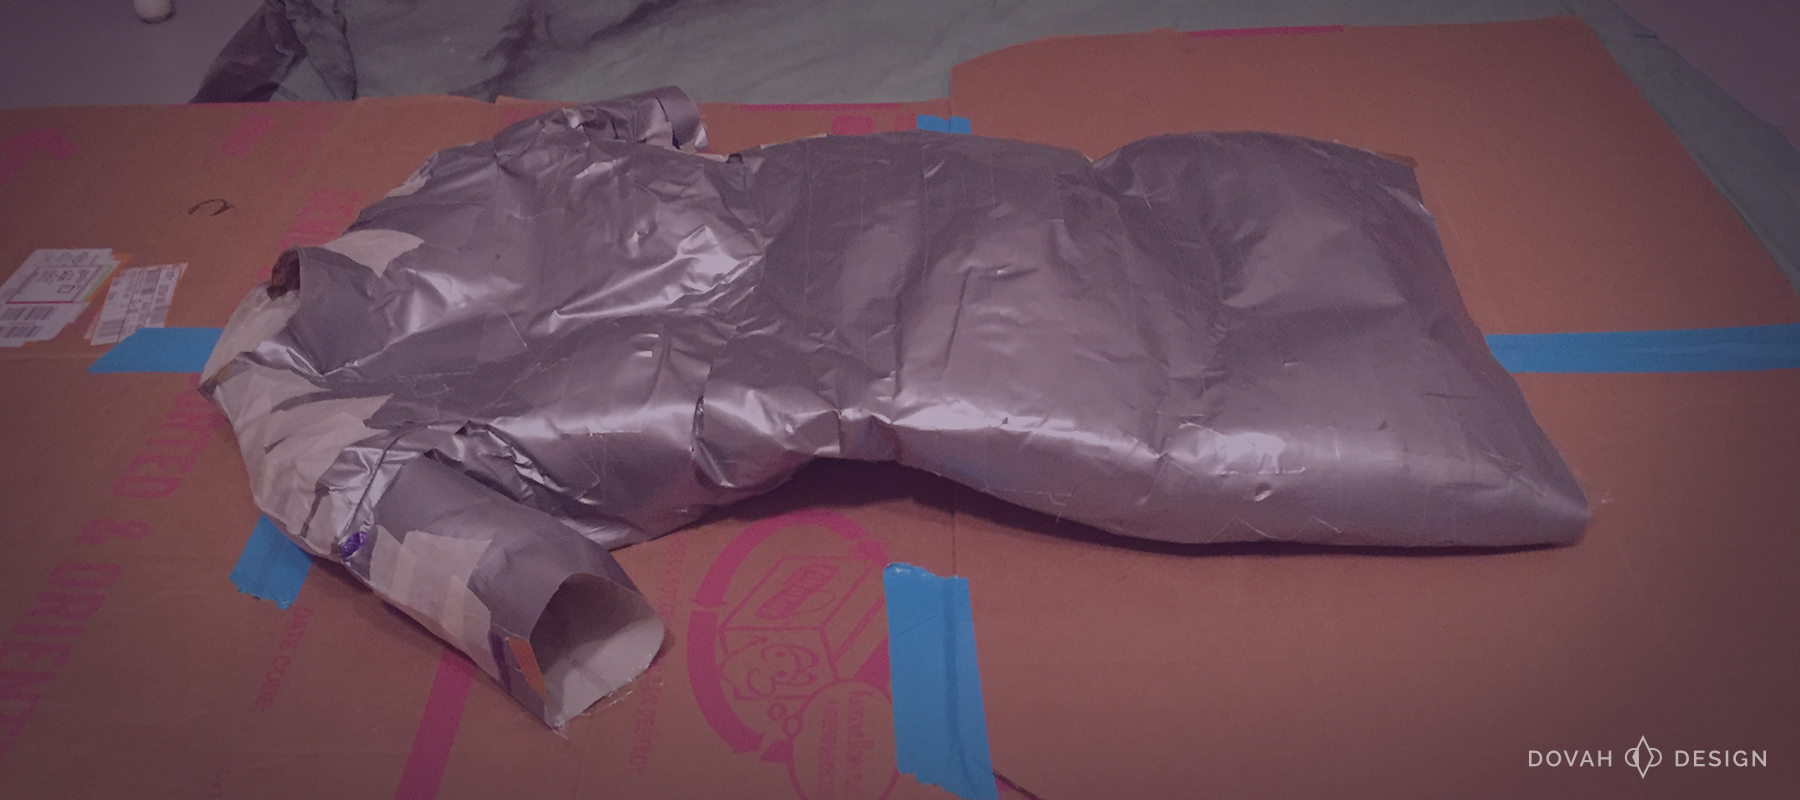
To keep my garage floors clean, I ripped apart some old junk cardboard boxes, and laid those out over an old sheet in my garage. You should also cover up any holes or gaps in your floor covering, in case expanding foam leaks out of your shell. I taped a few areas on my cardboard for this exact reason.
Duct tape shell laying on floor on top of cardboard, ready for expanding foam to be applied.
Before you begin applying foam, be sure to put on a pair of rubber gloves to protect your hands. Getting expanding foam on your skin is no joke! The closest thing I can compare it to is Gorilla Glue. It’s extremely tacky, and does not wash off with simple soap and water. I also wore my goggles, as recommended on the foam can, and a respirator, just to be extra safe.
Selfie wearing respirator and plastic gloves, prepped to begin applying expanding foam to duct tape shell for cosplay mannequin.


Step 8: Apply Expanding Foam: Phase One

Now is also the time to ensure you have all of your expanding foam cans and spray bottle of water close by, and ready to use. Follow the instructions on the expanding foam cans to prep them for use. When your first can is ready, reach inside your duct tape shell and begin applying the foam to the bottom side of the shell. I began at the neck, and worked my way in to the shoulders, arms, and upper torso. Be sure to create an even layer across one side of your shell, but feel free to build it up on itself a bit.
As you apply layers of foam, stop every so often and spray the foam with a fine mist from your spray bottle. Water activates the expanding foam, and helps it cure more quickly. As you can see in the video to the right, I started with two cans of foam, spraying water in intervals between layers. I then allowed the foam to cure for about 45 minutes before returning and adding another two cans of foam.

For reference, I an 5’6″, 130 pounds, and I used five 12-ounce cans of expanding foam for my cosplay mannequin. I used the basic “Great Stuff Expanding Foam.” You can cut down on the amount of cans needed if you purchase the “Big Gap Filler” version, or a larger size can.

Step 9: Apply Expanding Foam: Phase Two

After I had used four cans of foam, I allowed my cosplay mannequin to sit and cure overnight. The next day, I repeated this process, using another can to fill in any gaps. I also filled in the openings of the neck, legs, and arms, just to ensure they were filled enough.
I had to cut a small opening in my mannequin’s chest to be able to access the space that had not been filled properly. After cutting a hole and applying foam, I added a small piece of duct tape back over top to seal the shell again. Nothing leaked out, and the extra space filled in quite nicely!

Step 10: Clean Up Your Cosplay Mannequin

Once the foam is cured (I like to allow 24 hours), what you see may be sort of a lumpy mess. That is totally normal! This is the cheap way to get a copy of yourself, remember? We just need to clean up the foam a little with our box cutter.
Start by assessing the overall shape of your mannequin. Use your soft measuring tape to compare the cosplay mannequin dimensions to your own body. Trim off foam anywhere the dimensions are off, or any locations with large irregularities.
Cosplay mannequin result before cleaning it up, with bumps and exposed extra foam.
Using your scissors or box cutter, cut some slits in your duct tape. The idea is to be able to peel back the duct tape layer to access the foam that needs to be trimmed beneath. Use your box cutter to shave away the bumps or over-expanded sections. Be sure to only work on one section at a time, or you risk altering your foam’s shape too much.
Trimming off excess expanding foam from the front of my cosplay mannequin
Trimming the bottom of the cosplay mannequin flat to stand it up.
To finish up, trim the base of your mannequin to form an even, flat base. This is key to allowing the piece to stand on it;s own without constantly leaning or tottering. When you are happy with the new shape, carefully lay the duct tape back on top of the foam, and tape it back in place tightly.
Cosplay mannequin, expanding foam cured, and duct tape cut open to make adjustments.
Cosplay mannequin, expanding foam cured, and duct tape sealed back together after being cut open for adjustments.
To finish, duct tape over all the adjusted sections tightly. This will give your cosplay mannequin as even and smooth of a surface as possible.


Congratulations! Your Cosplay Mannequin is Complete!

Here are a few shots of my final cosplay mannequin. As soon as I had full use of the finished product, I began patterning my next cosplay, the Snow White Knight! My patterning time was cut nearly in HALF thanks to his mannequin, making it well worth the few hours of effort.
Final duct tape cosplay mannequin, completed and filled with expanding foam.
Have you used my tutorial to make your own cosplay mannequin? I’d love to see how it helped make costuming easier for you! Contact me or message me on Facebook or Instagram to show me your work! And as always, happy crafting everyone.
**Full Disclosure: I get credit when you purchase items via my Amazon links in this blog post! Any profits I receive from Amazon will go directly back into more blog posts and tutorials. Thanks in advance for considering a purchase 😀